The Smart Editor widget provides a streamlined editing experience and allows you to edit features and their related records. You can configure attributes to be hidden, required, or disabled dynamically. You can set up automatic calculations for attributes using values from other layers, such as location information in an address or coordinate format. The Smart Editor widget also allows you to set attributes once and apply those settings to all newly created features. Descriptive information can be controlled for the editor form by providing custom display text. Map navigation can be locked in the layer settings for easier editing on a touch screen device.
For examples of how to use this widget, see the Special Event Operations or Water Distribution Data Management for ArcGIS Enterprise solution.
Configure the Smart Editor widget
This widget can be set to open automatically when
an app starts. Click the Do not open this widget when
the app starts button  on the widget to turn on the option to open the widget automatically. (For widgets you need to add to the app first, you can make this setting after configuring the widget.)
- Hover over the widget and click the Configure this widget button
 to open the configuration window.
Note:
If you need to add the widget to the app first, click a widget placeholder on the Widget tab. In the Choose Widget window that opens, select the widget and click OK.
- Optionally click Change widget icon and replace the default icon for this widget with your own image. A file explorer window appears, allowing you to choose a local image file to use as the widget icon.
There are four sections to consider when configuring the Smart Editor widget: layer settings, smart actions, attribute actions, and general settings.
Layer settings
The layer settings include all the editable layers in the map and provide functionality to control the capabilities and actions of each layer.
Tip:
This widget does not override restrictive edit settings in the web map and service. If the service is set to only allow updates, the widget will not allow you to create or delete features. However, if the layer is set to allow creating and deleting features, these edit privileges can be restricted in the widget configuration for the web app when selecting custom settings.
- If you want to always synchronize the settings defined in the web map, choose Honor settings in the web map. These settings include:
- Which layers are editable
- The fields to display and edit
- The order of the fields
- Otherwise, choose Custom settings for more control over editing capabilities per editable layer. In the All Layers table, configure the following options for the layers that are enabled for editing:
- Editable—Allow only certain layers to be editable.
- Update Only—Optionally limit the layer to only update or modify existing features.
- Allow Delete—Optionally allow a feature to be deleted.
- Disable Geometry Editing—Optionally disallow reshaping and moving a feature's geometry.
- Optionally click the button under the Description column and provide text that appears above the attributes for each layer to help users perform edits.
Caution:
If you configured the app prior to version 10.8.1 and used custom XSS for this content, you may need to modify it to ensure that it appears as expected now because XSS filters have since been implemented for improved security.
- Click the Edit button
 under Actions and select which fields are visible and editable.
The dialog box lists all the fields for the layer. Database-required fields are noted with a red asterisk (*). By default, the widget carries over the display and editable attributes configured in the map. Details for each column are as follows:
- Display—Show this field on the attribute dialog box.
- Editable—Determine whether the field is editable. Noneditable fields are shown but are disabled.
- Name—Displayed for reference.
- Alias—Displayed for reference.
- Actions—Order fields and define the smart and attribute actions.
Note:
If a field belongs to a smart action group, you will have the option to update the group it belongs to or to remove the field from the group and update it separately.
- If you have relationships in your map, a table button is also available under Actions. Click the table button to access a layer's related layer or table.
Only parent-to-child relationships are shown. This is different from the identify pop-up in the Edit widget. If a child relationship is editable but the parent is not, the parent layer is shown but all attributes are disabled. If the parent relationship is editable but the children are not, these attributes are not displayed.
- Above the table is a breadcrumb showing where you previously browsed in this relationship hierarchy. Click a segment in the breadcrumb to load that item into the table.
The table shows your current level. All related items are listed. The options are as follows:
- Editable—Allow the related layer or table to be editable.
- Update Only—Optionally limit the layer to only update or modify existing features or records. The Editable option must be checked to enable this function. If the related item is a feature layer, this will be checked and unavailable. This widget prevents you from creating related features; you can only edit the attributes of existing related features.
- Allow Delete—Optionally allow features or records to be deleted. The Editable option must be checked to enable this function.
- Disable Geometry Editing—This option is unavailable for all related items.
- Description—Optionally provide a description above the attributes for each layer. This option opens the Description dialog box.
- Actions—Select which fields are editable, visible, and included in the preset value list, and define the smart and attribute actions. Allow access to a related layer or table if available.
- Optionally change how attributes load when a record is edited. Checking the following settings applies to all parent layers and related tables or layers:
- Expand all parent layers on load—Attributes expand when a record is created or updated in a parent layer.
- Expand all related tables/layers on load—Attributes expand when a record is created or updated in the related tables or layers of a parent layer.
Smart actions
Smart actions define the behaviors applied on a field such as being required, hidden, or disabled based on a defined expression. Use the following steps to build out smart actions across multiple layers and group similar actions together.
Note:
Smart actions can also be configured directly from the Layer Settings tab. Actions set from the Layer Settings tab can stand independently or result in the creation of a Smart Actions group.
- On the Smart Actions tab, click Add New. In the Configure Smart Action window, for Group Name, provide a name that describes the group.
- For Layer for Expression, choose the layer for which fields will be used to define the expression criteria.
- For Expression, click the Edit Expression button and build expressions to filter layers with a possible equivalent expression and validate against chosen fields.
- If your action causes a field to be hidden, check Submit attribute data for fields even when hidden. This option will submit the data in this field.
- In the Layers and fields to apply on section, choose to hide, require, or disable any field.
Tip:
Use the search box to filter fields and use Expand all layers to show all fields for all layers.
This section lists layers and fields that are valid options based on the expression. Only one action can occur per field; if you select more than one, priority will determine the order in which these actions will be executed. To change priority, click the Set Smart Actions Priority button
 and use the up and down arrows to reorder.
Note:
If there is a yellow icon next to an action on a corresponding field, the field has an action already defined on it in another group. Checking this action will cause the field to be removed from the other group and to join the current group.
Attribute actions
Attribute actions determine how the value in a field is defined or manipulated when a requirement is met. Use the following steps to build attribute actions across multiple layers and group similar actions.
Note:
Attribute actions can also be configured directly from the Layer Settings tab. Actions set from the Layer Settings tab can stand independently or result in the creation of an Attribute Actions group.
- Add new actions in the Intersection section to populate a field based on a field value from an intersecting layer. The settings in the window that opens are as follows:
- Group Name—Name that describes the group.
- Data Type—Provides data types. Once an option is selected, Data Type filters the list of matching fields by layer.
- Ignore layer ranking and find closest feature across all defined layers—Check this box to use the closest intersecting feature. Layer ranking is determined by the layer order in the Layer(s) to extract a value section—the layer at the top of the list is considered first for the intersection.
- Layer(s) to extract a value
- Layers—Layer that will be intersected.
- Fields—Field that will be extracted from the selected layer.
- Tolerance Settings—The threshold for an intersect to occur.
Click the Tolerance Settings button
 to set a custom tolerance value for this layer or check Use Default Tolerance to use tolerance settings from the general settings.
 - Actions—Controls the order and allows you to delete an entry.
- Layer(s) and field(s) to apply extracted value—Select the fields from desired layers to apply the extracted values on.
Tip:
If you have multiple layers defined for an intersected value, the widget searches from top to bottom on this list for an intersected value. Once the first successful value is found, all other layers in the list are ignored. To allow the user to select between multiple intersecting values from the intersected layer, enable the intersection value picker in the general settings.
- Add new actions in the Address section to populate a field based on an address at a specified location using a locator service. The settings in the window that opens are as follows:
- Group Name—Name that describes the group.
- Attribute—The available fields based on the defined geocoder.
- Layer(s) and field(s) to apply extracted value—Fields to apply the address attribute on.
Note:
To define the locator service, go to the General Settings tab and click Geocoder Settings. By default, the widget uses the locator defined in your organization.
Tip:
If multiple results are returned from the locator, the highest matching score will be used.
- Add new actions in the Coordinates section to populate a field based on coordinates. Coordinates can be latitude-longitude, the map's spatial reference, or Military Grid Reference System (MGRS). The settings in the window that opens are as follows:
- Group Name—Name that describes the group.
- Reference System—The available coordinate systems use the current map’s spatial reference, latitude-longitude, or MGRS.
- Attribute—Based on the selected coordinate system, choose from one of the following combinations: X, Y, or X Y; Latitude, Longitude, or Latitude Longitude; and MGRS.
- Layer(s) and field(s) to apply extracted value—Fields to apply the coordinate system attribute on.
Tip:
If users create or update a polygon, the coordinates of the centroid of the polygon are used. If users create or update a line, the starting point is used.
- Add new actions in the Preset section to define the fields that users can populate with attribute values when creating new features. The settings in the window that opens are as follows:
- Group Name—Name that describes the group.
- Data Type—Filters the fields in the Layers and fields to apply on setting by the specified data type. To view fields using coded value domains, choose Number.
- Layers and fields to apply
on—Provides a list of layers and fields that are
valid options based on the data type and domain filters. A blue asterisk (*) indicates domain fields. Select the fields for which you'll create a preset.
Tip:
Use the search box to filter fields and use Expand all layers to show all the fields for each layer.
Note:
If a field has a yellow icon next to it, a preset action has already been applied for that field in another group. Checking this field for the current preset removes the field from the other group to join the current group.
- Preset Value—The default value for the field. Specify a default value in the text box or leave it blank. Clicking Select Value provides three options depending on the data you're configuring:
- Field values—When the data type is not set to date and you have not checked any domain fields, the Select Value window allows you to specify a field value from a layer.
- Domains—When you have checked at least one domain field, the Select Value window includes a list of the domain values from all the selected fields. Specify a default as the preset value.
- Dates—When the data type is date and you have not checked any domain fields, the Select Value window allows you to specify a fixed
or relative date. A fixed date is a value that does not change over time; whereas, a relative date changes based on the date and time when the feature is created. Select from the following options:
- Fixed—Preset uses the same specified date and time as the default value for all new features. Define a custom date and time value or select an existing value from a layer in the map.
- Current—Preset uses the value of the current date and time for each new feature.
- Past—Preset subtracts the specified value from the current date and time for each new feature.
- Future—Preset adds the specified value to the current date and time for each new feature.
- Hide in preset value display—Hides the preset from the widget pane but still populates the value when a record is created.
Note:
The preset values are only applicable to new feature creation. Presets do not apply when updating existing features. To allow updating intersection, coordinates, and address attribute actions for existing features, enable Show Attribute Actions update button in the general settings. For automatic updates when the geometry of an existing feature is updated, also enable Automatically call Attribute Actions after geometry update.
General settings
This section includes settings for the widget that allow you to control the validation and user interface. You can also change geocoder settings.
- If you configured a field in your feature layer or table to get its value from an address, click Geocoder Settings to define the locator URL.
Note:
By default, the geocoder is populated with the locator defined in your organization. If you change the URL, change the attribute source in the address attribute action as well.
- In the Feature Template and Filter Value Settings section, select from the following options:
- Show drawing options—Display a list of valid drawing options for the selected template.
- Allow user to create new feature(s) from existing feature(s)—Enable users to create a new feature by selecting an existing feature.
- Copied feature values override default—Enable feature values to carry over to the new feature. Values from the copied features will override the default template values only for the matched fields.
Note:
Copying multiple polyline or polygon features into a layer with a unique value field only allows creating a multipart feature.
- Copied feature values override default—Enable feature values to carry over to the new feature. Values from the copied features will override the default template values only for the matched fields.
- Display preset value list on top—Display the preset value list above the template picker.
- Use feature template filter—The feature template filter presents the keyword and layer filter to narrow the list of edit templates. Check the box to enable this option.
- Keep selected template active—Keep the selected template active.
- Apply filter values from Group Filter widget to Preset fields—Filters configured in the Group Filter widget are applied to the preset fields in the Smart Editor widget.
Caution:
Group Filter and Smart Editor must be configured in the app to be accessible simultaneously. Additionally, the preset's group name in Smart Editor must be the same as the filter set name in Group Filter.
- In the Save Settings section, select from the following options:
- Position of Save, Delete, Back and Close buttons—Display the buttons above or below the form.
- Prompt to save unsaved edits when form is closed or switched to the next record—Display a prompt when the current feature has unsaved edits. (Copying multiple features saves automatically.)
- Require confirmation when deleting a record—Display a prompt when deleting a record to confirm the action.
- Save new feature automatically—Automatically save edits so you can quickly digitize new features.
- Remove feature from selection on save—Transition to the next record or back to the Edit Template page when there is only one record.
- Switch to multiline input when field length exceeds—Switch text input from a single line to multiline.
- In the Geometry Settings section, select from the following options:
- Enable geometry edit by default—Enable geometry edits by default so you can quickly modify the shape of a feature.
- Enable locking of map navigation—Lock map navigation to help with editing on touch screen devices.
- Enable moving of selected point feature to GPS location—Enable a point feature to move to the current GPS location.
- Enable moving of selected point feature to XY location—Enable a point to move to a specified x,y location using the map’s current spatial reference, latitude-longitude in decimal degrees, or MGRS coordinate.
- Set the tolerance for feature selection (pixels)—Enables opening the attribute editing panel by clicking the feature.
- In the Actions Settings section, select from the following options:
- Enable intersection value picker—Display a prompt when multiple values are available for a field with an intersection attribute action.
- Show Attribute Actions update button—If you defined attribute actions on any field, this option allows you to update the values derived from attribute actions when you change a feature's geometry.
- Automatically call Attribute Actions after geometry update—This option automatically updates the value derived from attribute actions on any field when you change a feature’s geometry.
Caution:
When using the widget, if the feature geometry is updated, any existing values in fields with attribute actions configured will be overwritten with the new intersecting, address, or coordinate value if Auto update feature attributes is turned on.
- Automatically call Attribute Actions after geometry update—This option automatically updates the value derived from attribute actions on any field when you change a feature’s geometry.
- Default intersection tolerance for all features—Enable a global tolerance for intersections.
Default intersection tolerance (pixel value) to be applied for point features only—If the default intersection tolerance for all features is set to 0, use this setting for point features.
- In the Provide text to display for the editing panel section, change or remove the text to appear above the feature template list. Provide text to help your users perform their edits. This is useful if no layers allow the creation of new features, and the template list is hidden.
- Click OK to close the configuration window.
Use the Smart Editor widget
Open the Smart Editor widget to display the template picker and preset value list. If the layer you want to edit does not appear in the template picker, ensure that Editable is checked for the layer in the configuration and the layer is visible on the map.
Create features
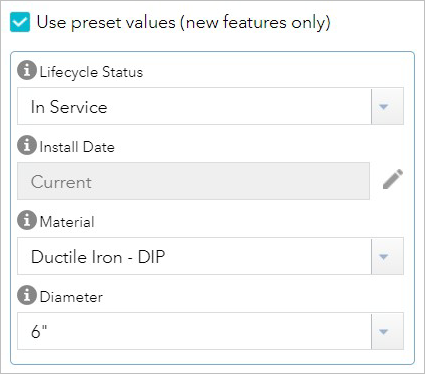
- If you have configured fields to include in the preset list, enter their values.
Note:
The preset values are only applicable to new feature creation. Presets do not apply when updating existing features.
Tip:
You can define the value for a preset with a URL parameter using the following format: https://<domain>/apps/webappviewer/index.html?id=<itemid>&<preset name>=<value>
When defining a date and time value with a URL parameter, you can only specify a fixed date and must use the Unix Epoch timestamp format. For example, the value for 29 September 2020 at 12:00:00 PM PDT is 1601406000000.
- To add a feature:
- Click its symbol in the template.
Tip:
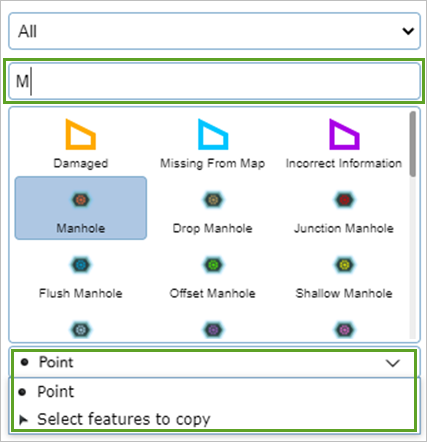
If available, filter the feature templates by searching for a template by name.
- Choose to add or draw the feature on the map or to create it by copying an existing feature from the map.
- Click its symbol in the template.
- In the attributes that appear for the added feature, enter information in the available fields.
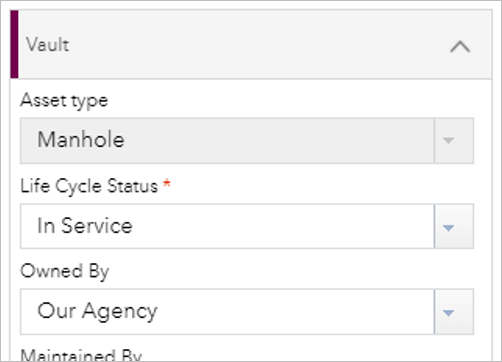
The fields vary based on the editable attribute fields in the feature service and the configuration of the editable layer.
- To attach an image or other files with a feature (when available), click Choose File in the Attachments section and browse to the file on your device.
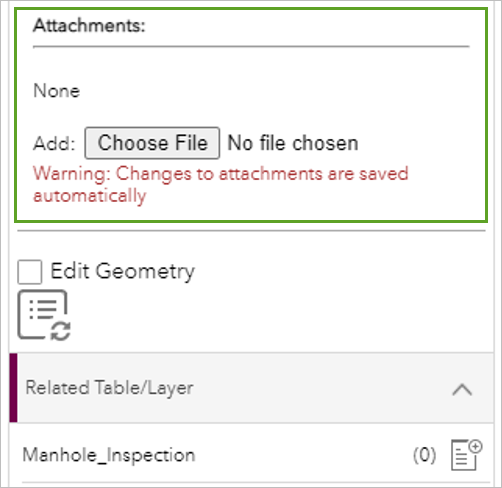
- To add related records in a related table or layer, click the Create new feature button
 and enter information in the available fields.
Update features
- To update a feature, ensure that a template isn't selected and click a feature on the map to open its attributes and edit its information and geometry.
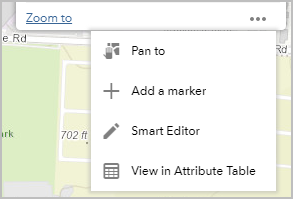
The Smart Editor widget can also be accessed from a selected feature's pop-up feature actions.
- To update feature geometry, ensure that the Edit Geometry box is checked and use the following buttons, if available:
- Auto update feature attributes
 —Click this button to update dynamic feature attributes. (A green check mark indicates that attributes are updated automatically when the geometry is updated.)
 - Map Navigation
 —Click this button to lock or unlock the map navigation when editing on a mobile device. (A green check mark indicates that map navigation is locked.)
 - Move selected feature to current GPS location
 —Click this button to move the selected feature to the current position provided by the GPS device.
 - Move selected feature to XY location
 —Click this button to move the selected feature to a specified x,y location using the map's current spatial reference, latitude-longitude in decimal degrees, or MGRS coordinate.
- Auto update feature attributes
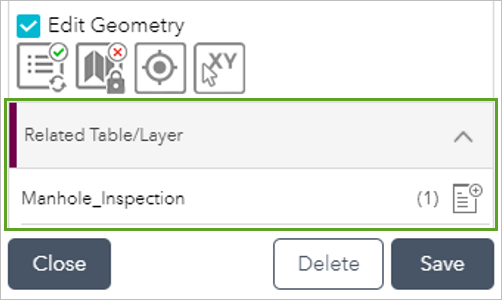
- For Related Table/Layer, click a related record to open its attributes and edit the information.
- To remove a feature, click Delete.