ArcGIS Server 10.9 for ArcGIS Server is provided as a setup program and is executed through a utility named Setup.exe.
The ArcGIS Server 10.9 setup package is capable of upgrading 10.4 and later versions currently installed on your system. To do this, follow the instructions below.
Caution:
The upgrade process will restart all of your ArcGIS Server services. You should consider your ArcGIS Server site to be offline during the upgrade.
Upgrade ArcGIS Server from 10.3.1 or earlier
Upgrading directly to ArcGIS Server 10.9 from versions 10.3.1 or earlier is not supported. To upgrade ArcGIS Server 10.9 or earlier, first upgrade it to an interim version (10.4-10.8.1). Then upgrade that version to ArcGIS Server 10.9. This will preserve your site's configuration store and server directories.
Sites at version 10.0 and earlier cannot keep any existing content or directories. You must uninstall the software and install ArcGIS Server 10.9 as a new site.
Prepare to upgrade ArcGIS Server
Before upgrading, carefully review the following information. See the full list of frequently asked questions for upgrading ArcGIS Server.
- If you're upgrading to 10.9, you'll need to reauthorize your software with a new authorization file for 10.9. You can access your new authorization files in My Esri.
- For your ArcGIS Enterprise portal to function, it must be the same version as your hosting server. You also need to reinstall your Web Adaptor instances to the same version as ArcGIS Server.
- The recommended order to upgrade your 10.9 deployment is the following:
- Upgrade Portal for ArcGIS.
- Upgrade ArcGIS Web Adaptor (for Portal) for IIS or Java (Windows).
- Upgrade the ArcGIS Server site serving as the portal's hosting server.
- Upgrade ArcGIS Web Adaptor (for Server) for IIS or Java (Windows).
- Upgrade ArcGIS Data Store (upgrade primary first, then stand-by).
- Upgrade any other ArcGIS Server sites in the deployment.
- Upgrade ArcGIS Desktop if it's installed on any of your machines.
Note:
You don't need to upgrade ArcGIS Pro at the same time as ArcGIS Enterprise.
- Do not unfederate any server federated with a portal when you upgrade your deployment. This adversely impacts your portal deployment, as users will be unable to access, share, or use ArcGIS Server services in the portal.
- If you've already configured an enterprise geodatabase as the managed database for your hosting server and you're upgrading from 10.6 or earlier to 10.9, you'll need to conduct a few additional steps. Once you've upgraded ArcGIS Server, you'll need to register the enterprise geodatabase as a database (as opposed to a managed database). Then, install ArcGIS Data Store and register it as a relational data store. This will configure ArcGIS Data Store as your hosting server's managed database.
- Your ArcGIS Enterprise portal's version must match the version of the hosting server, any GeoAnalytics Server, any GeoEvent Server, and any raster analysis server federated with it. For information on supported versions for other federated servers, see Federate an ArcGIS Server with your portal.
- If you back up your ArcGIS Server site before upgrading, you can use the backup if you need to roll back to the previous version. For steps on how to back up your ArcGIS Server site before upgrading, see Back up and restore your ArcGIS Server site configuration.
- If your site is in read-only mode, the site mode will be set to editable when you upgrade. After all machines in your site have been successfully upgraded, the site will remain in editable mode. You can switch back to read-only mode once your upgrade is complete.
- Before upgrading, clear the cache of all web browsers used to access the ArcGIS Server deployment.
- Before you upgrade your ArcGIS Server site, ensure that any databases you use are supported at the upgraded ArcGIS Server release. See the relevant relational database management systems requirements topic below for details. Use the Other versions drop-down list to choose the ArcGIS version to which you'll be upgrading.
- Before upgrading, check that required ports are open for communication.
Upgrade a single-machine site
If you have a single-machine ArcGIS Server site, follow the steps in the sections below to upgrade the ArcGIS Server machine to version 10.9. The following options are available to upgrade your ArcGIS Server site:
Upgrade a multiple-machine site
If you have a multiple-machine ArcGIS Server site, you need to upgrade each machine in the site to version 10.9. It's recommended that you upgrade each ArcGIS Server machine sequentially; that is, wait until the first machine is upgraded before continuing the upgrade on the next one. Each ArcGIS Server machine in the site must be at the same version number and be licensed exactly the same.
If you have ArcGIS Web Adaptor configured with your machines, upgrade each ArcGIS Web Adaptor instance once its corresponding ArcGIS Server machine has finished upgrading.
If you have a multiple-machine ArcGIS GeoAnalytics Server site, follow the additional steps in the Upgrade GeoAnalytics Server section below when upgrading.
The following options are available to upgrade your ArcGIS Server machines. Repeat the upgrade steps on each ArcGIS Server machine to upgrade your site to version 10.9.
Upgrade using the setup program
Note:
It is recommended that you use the setup.exe file to upgrade ArcGIS Server to 10.9. If organizational restraints prevent you from using the setup.exe file, see Upgrading an earlier version silently using setup.msi.
During the installation, read the master agreement and accept it, or exit if you do not agree with the terms.
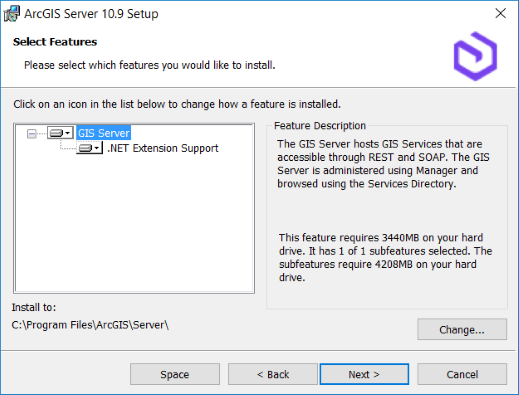
The setup program displays the features that will be installed.

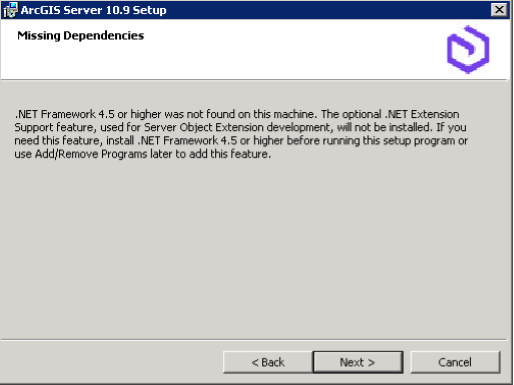
If you see the following dialog box after the Select Features dialog box, Microsoft .NET Framework 4.5 was not found on your machine. The .NET Extension Support feature requires Microsoft .NET Framework 4.5. The .NET Extension Support feature is required for server object extension (SOE) and server object interceptor (SOI) development and use. If you intend to develop or use SOEs or SOIs, follow the instructions on the dialog box to install the .NET Extension Support feature.
Legacy:
In earlier versions, the ArcGIS Server setup required Microsoft .NET Framework 3.5 Service Pack 1 (SP1) to install the .NET Extension Support feature.

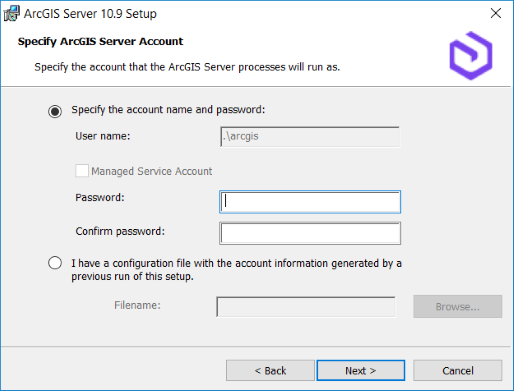
The ArcGIS Server account used by your existing installation is prepopulated in the ArcGIS Server Account input box. Provide the password for the ArcGIS Server account. Typically, this is the password you defined when installing the software. If the password has changed since you installed the software, for example, by using the Configure ArcGIS Server Account Utility, you need to provide the password you designated when modifying the account.
If the password is not validated successfully, an error message appears indicating that the password is invalid. If you are unsure of the password for the ArcGIS Server account, contact your system administrator or reset your password using the Configure ArcGIS Server Account Utility. For more information, see The ArcGIS Server account.
If you select the second option, I have a configuration file with the account information generated by a previous run of this setup, the credentials in the server configuration file must be the same credentials used by your existing ArcGIS Server site.

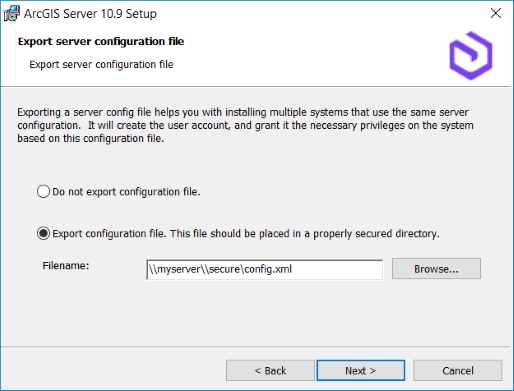
If you select Specify the account name and password and manually enter the ArcGIS Server account information, the next dialog box presents you with the option to export a server configuration file. If you do not want to export a configuration file, click Next, and accept the default Do not export configuration file option. If you want to export a server configuration file for future installations, select Export configuration file. Browse to a secure folder and provide a name for the configuration file.
Note:
The following are reasons you may want to export a server configuration file:
- Create the same ArcGIS Server account when installing on multiple machines.
- Store the account for use when upgrading to a newer version.
- Perform a silent installation in which the user name and password are encrypted.

Caution:
When exporting a server configuration file to a network share, the Local System account on the machine where ArcGIS Server is being installed must have write permissions to the network share. For example, if you're installing ArcGIS Server on a machine named Quick, the Local System account on Quick must have write permission to the network share. If the permissions are not set, the server configuration file may not export successfully. If you're unsure how to correctly set permissions for the network share, contact your system administrator or export the server configuration file locally and copy it to the network share.
To complete the installation, follow the directions on the screen.
After installation is complete, the software authorization wizard opens for you to reauthorize ArcGIS Server with a new license file. You can access your new authorization files in My Esri. You can choose to authorize your software later, but you must complete this workflow before moving on to the next step of the upgrade process.
Note:
If you'll be authorizing your ArcGIS Server as multiple licensing roles, you'll need to run the software authorization wizard again, once for each licensing role you apply to the machine.
If your ArcGIS Server license has an expiration date, consider updating the licenses in your enterprise geodatabases after upgrading and updating your ArcGIS Server license. If the license you use for your hosting server has an expiration date, update the license in your relational ArcGIS Data Store after upgrading and updating your ArcGIS Server license and upgrading the relational data store.
- Once authorized, ArcGIS Server Manager automatically opens. Click Continue Server Upgrade to complete the upgrade. You must use ArcGIS Server Manager on the local machine where you're running the upgrade to complete this step. You cannot Continue Server Upgrade through a Web Adaptor or load balancer.
Caution:
If errors are returned when you click Continue Server Upgrade, you may need to address the errors before you can continue. For example, if you encounter an error about an invalid license, you will need to reauthorize the software using a valid license. You can retry by clicking Continue Server Upgrade again.
If you configured ArcGIS Web Adaptor to work with your site, you'll need to install a 10.9 Web Adaptor as well. Follow the instructions for the type of Web Adaptor you use.
- Installing ArcGIS Web Adaptor (IIS) 10.9
- Installing ArcGIS Web Adaptor (Java Platform) 10.9 on Windows
If you have a multiple-machine ArcGIS Server site, repeat the steps above on the remaining ArcGIS Server machines in your site. Wait until a site has finished upgrading before clicking Continue Server Upgrade on another site.
- If you'll use the upgraded ArcGIS Server as an ArcGIS GeoAnalytics Server or for raster analysis with ArcGIS Image Server and you haven't previously used either of these roles, follow these steps to use your upgraded ArcGIS Server site for these purposes:
- Be sure you authorized the site with an ArcGIS GeoAnalytics Server or ArcGIS Image Server licensing role.
- Sign in to the portal federated with your site. Sign in as a member of the default administrator role. The portal URL is in the format https://webadaptorhost.domain.com/<webadaptorname>/home.
- Click Organization > Edit Settings > Servers.
- On the Servers page, click Validate Servers to verify that the federated server you want to use as an ArcGIS GeoAnalytics Server or raster analysis server can still communicate with the portal. A green check mark appears next to each valid federated server.
- Once you verify that the server is valid, configure it as the portal's GeoAnalytics Server or raster analysis server by choosing the federated server from the Feature Analysis - GeoAnalytics Tools or Raster Analysis drop-down list.
- If you're upgrading from 10.4.1 or earlier, restart the ArcGIS Server service on the machines in the portal's hosting server and the machines in the federated ArcGIS GeoAnalytics Server and raster analysis server (ArcGIS Image Server).
If you want the ability to update passwords in registered and managed database connections used by existing services, run the ExternalizeConnectionStrings.bat command utility to update existing service connections.
If you've customized a service with SOEs or SOIs, restart the service after upgrading ArcGIS Server.
Silently upgrade
When silently upgrading using the setup.exe file, you must specify the ArcGIS Server account used by the software. Typically, this is the account you defined when installing the software. If the account has changed since you installed, for example, by using the Configure ArcGIS Server Account Utility, you must provide the user name and password you designated when modifying the account.
If you do not specify the ArcGIS Server account, or it does not match the ArcGIS Server account used by your current installation, the installation process displays a message indicating that the credentials could not be validated. As a result, the installation will exit.
You can determine the ArcGIS Server account by accessing the Configure ArcGIS Server Account Utility from the Start menu on the machine hosting ArcGIS Server. The ArcGIS Server account is listed on the dialog box. If you are unsure of the password for the ArcGIS Server account, contact your system administrator or reset your password using the Configure ArcGIS Server Account Utility. For more information, see The ArcGIS Server account.
In the following example, the ArcGIS Server account used by the software is myaccount:
<path to ArcGIS Server setup download folder>\Setup.exe /qb USER_NAME=myaccount PASSWORD=mypassword
After the installation completes, the software authorization wizard opens for you to reauthorize ArcGIS Server with a new license file. You can access your new authorization files in My Esri. You can choose to authorize your software later, but you must complete this workflow before moving on to the next step of the upgrade process.
Note:
If you'll be authorizing your ArcGIS Server as multiple licensing roles, you must run the software authorization wizard again, once for each licensing role you apply to the machine.
If your ArcGIS Server license has an expiration date, consider updating the licenses in your enterprise geodatabases after upgrading and updating your ArcGIS Server license. If the license you use for your hosting server has an expiration date, update the license in your relational ArcGIS Data Store after upgrading and updating your ArcGIS Server license and upgrading the relational data store.
Once authorized, ArcGIS Server Manager automatically opens. Click Continue Server Upgrade to complete the upgrade.
Note:
You must use ArcGIS Server Manager on the local machine where you are running the upgrade to complete this step. The Continue Server Upgrade operation cannot be completed through a Web Adaptor or load balancer.
Starting at 10.6, you can also use the upgradeserver command line utility to complete the upgrade and postupgrade operations silently. In the command line, browse to your <Server install directory>/tools/upgradeserver folder and run the following: upgradeserver.bat -s. For assistance, run the command with -h or --help.
If you configured ArcGIS Web Adaptor to work with your site, you'll need to install a 10.9 Web Adaptor as well. Follow the instructions for the type of Web Adaptor you use.
- Installing ArcGIS Web Adaptor (IIS) 10.9
- Installing ArcGIS Web Adaptor (Java Platform) 10.9 on Windows
Note:
If you have a multiple-machine ArcGIS Server site, repeat the silent upgrade above on the remaining ArcGIS Server machines in your site.
You can update passwords and/or hostnames in registered and managed database connections used by existing services.
Upgrade ArcGIS GeoAnalytics Server
If you have a multiple-machine GeoAnalytics Server site, you must complete additional steps when upgrading your deployment as follows:
- Stop the ArcGIS Server service on all machines in the GeoAnalytics Server site using the Windows Service Manager desktop app.
- Restart each machine in the site. Once restarted, open the Windows Service Manager on each machine. If the ArcGIS Server service is running, stop the service.
- Check for any orphaned ArcGIS Server processes that are known to impede the upgrade process as follows:
- Open Task Manager to view running processes. Click More Details if it's not open by default.
- On the Details tab, right-click the Name header and click Select Columns.
- On the Select Columns dialog box, check the Command Line option and click OK. Sort the processes by the Name column.
- Look for processes named cmd.exe. In the Command Line column, check for paths beginning with <ArcGIS Server install location>\ArcGIS\Server\. If these processes exist, right-click each and click End Task.
- Look for processes named java.exe. In the Command Line column, check for paths beginning with <ArcGIS Server install location>\ArcGIS\Server\. If these processes exist, right-click each and click End Task.
- Repeat the above steps for all machines in the GeoAnalytics Server site.
- When you're sure that no orphaned ArcGIS Server processes are still running, follow the upgrade steps in this topic to upgrade the primary machine in your GeoAnalytics Server site, whether you're using the setup program or upgrading silently.
- Repeat these steps for each machine in the site.
- When all machines have been upgraded, stop the ArcGIS Server service on all machines again. Wait at least five minutes to allow the system to make necessary adjustments.
- After at least five minutes have elapsed, use the Services app to restart the ArcGIS Server service on all machines in your site. Again, wait at least five minutes after restarting the service.
- Use the Compute Platform Health Check operation in the ArcGIS Server Administrator Directory to verify that your GeoAnalytics Server site is ready to use.
Scan for security best practices
It is recommended that you use the serverScan.py script to check for security best practices with your ArcGIS Server after installation.